How to Install Downspouts in 5 Simple Steps
Why Proper Downspouts Installation Protects Your Home From the Ground Up
Downspouts installation is one of the most important steps in protecting your home from water damage. Done right, it moves thousands of gallons of rainwater safely away from your foundation every year. Done wrong, it can lead to flooded basements, soil erosion, and foundation cracks that cost anywhere from $2,000 to $15,000 to repair.
Here’s a quick overview of how to install downspouts correctly:
- Plan placement – one downspout every 30-40 feet of gutter, ideally at corners
- Cut the outlet hole in the gutter at its lowest point and attach the drop outlet with sealant
- Install elbows to create a wall offset, directing water from the gutter to the wall
- Attach vertical downspout sections from top to bottom, securing with straps every 6-8 feet
- Add a bottom extension that directs water at least 4-6 feet away from your foundation
A few inches of rain on a typical roof can produce several thousand gallons of runoff. Without properly installed downspouts, that water has nowhere to go except straight down — pooling against your foundation walls, seeping into your basement, and slowly weakening your home’s structure.
This guide walks you through every step of the process, from sizing and material selection to advanced drainage options like underground pipes and rain barrels.

Planning Your Downspouts Installation
Before we grab the ladder and tin snips, we need a solid plan. In Central Ohio, we experience a mix of heavy spring rains and icy winters. This means our downspouts installation needs to be robust enough to handle high-volume runoff while resisting the expansion and contraction caused by our local freeze-thaw cycles.
Calculating Your Needs
The first step is determining how many downspouts your roof actually requires. The standard rule of thumb is to install one downspout for every 30 to 40 feet of gutter run. If you have a particularly large roof or live in an area prone to torrential downpours, you might want to increase that frequency.
To get technical, you can calculate the number of downspouts needed by dividing your total roof area by the drainage capacity of the downspout size you choose.
- 2×3 inch downspouts: These are standard for many residential homes and can handle up to 600 sq. ft. of roof area.
- 3×4 inch downspouts: These are the “heavy hitters.” They can manage up to 1,200 sq. ft. of roof area. In Central Ohio, we often recommend the larger 3×4 size because they are significantly less likely to clog with debris and can handle the sudden, heavy rain bursts common in our region.
Material Selection
Choosing the right material is about balancing aesthetics, durability, and budget. Here in the April 2026 market, homeowners have several great options:
| Material | Lifespan | Pros | Cons |
|---|---|---|---|
| Aluminum | 20-30 Years | Rust-proof, lightweight, many Color Options | Can dent easily |
| Vinyl | 10-15 Years | Inexpensive, DIY-friendly, won’t rust | Can become brittle in Ohio winters |
| Galvanized Steel | 20+ Years | Very strong, resists wind damage | Can eventually rust if coating is scratched |
| Copper | 50+ Years | Beautiful patina, extremely durable | Most expensive option |
For most Central Ohio homes, aluminum is the gold standard because it won’t rust in our humid summers or snowy winters. If you’re looking for a more permanent solution, checking out How It Works for high-capacity systems can save you a lot of headache later. If budget is a concern, we also offer Financing to ensure you don’t have to compromise on the safety of your foundation.
For a deeper dive into preparation, you can check out this How to Install a Downspout: Step-by-Step Guide – Opple House.
5 Steps to a Professional Result
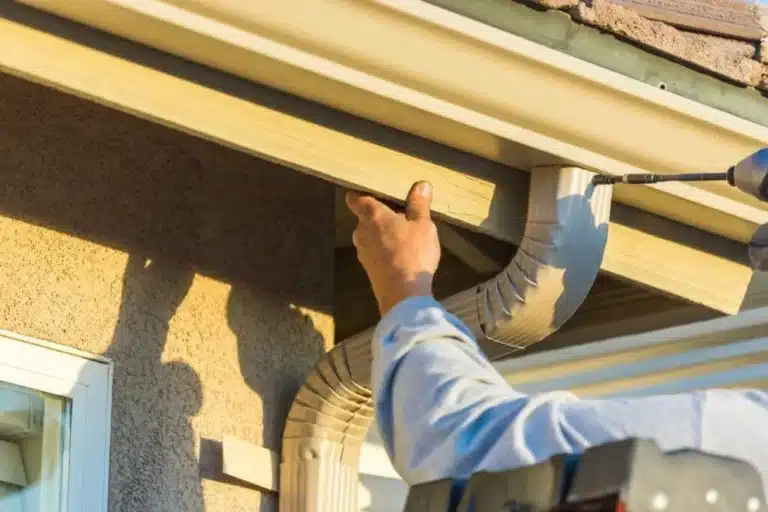
Now that we’ve planned the layout and picked our materials, it’s time for the actual downspouts installation. You’ll need a few specialized tools to do this right: tin snips, a rivet gun, a drill, a crimper, and high-quality gutter sealant.

Preparing for Downspouts Installation
The success of your downspout depends entirely on the gutter above it. We must ensure the gutter is sloped correctly—usually 1/4 inch of drop for every 10 feet of gutter toward the downspout location.
- Mark the Outlet: Identify the lowest point of the gutter. Place your drop outlet (the flange that connects the gutter to the downspout) on the bottom of the gutter and trace around the inside of it with a marker.
- Cut the Hole: Drill a starter hole inside your mark. Using your tin snips, cut out the hole. Pro tip: if you are using aluminum, cut with the finished side up to prevent scratching the paint.
- Remove Burrs: Use a file or the edge of your snips to smooth out any jagged metal edges. This prevents leaves and hair from snagging and starting a clog.
- Attach the Outlet: Apply a generous bead of gutter sealant to the flange of the drop outlet. Insert it into the hole and secure it with pop rivets or sheet metal screws.
You can see examples of properly prepared outlets in our Photos gallery.
Finalizing the Downspouts Installation
With the outlet in place, we move to the vertical assembly. This is where most DIYers make mistakes, so pay close attention to the “nesting” of the pipes.
- The Wall Offset: Most gutters sit several inches away from the wall. We use two elbows and a short piece of downspout pipe to create an “S” curve that brings the drainage from the gutter back to the side of the house. Always ensure the top piece fits inside the bottom piece. If you do this backward, water will leak out of every joint.
- Securing the Elbows: Once the elbows are positioned, secure the joints with two rivets per side.
- The Vertical Run: Measure the distance from your wall offset to the ground. Subtract the height of your bottom elbow. Cut your downspout to length. If you need to join two pieces of downspout, use a crimping tool on the top piece so it slides neatly into the lower piece.
- Install Straps: Secure the downspout to the wall using straps (or brackets). These should be placed every 6 to 8 feet. In Central Ohio, we recommend fastening these into the house framing, not just the siding, to withstand high winds.
- The Discharge: Attach a final elbow at the bottom and an extension. According to best practices, this extension should carry water at least 5 feet away from the foundation.
- Test the System: Once the sealant has dried, run a garden hose into the gutter. Check every joint for leaks. If you see drips, add more sealant to the inside of the joint.
For more technical details on assembly, refer to this How To Install A Gutter Downspout (Step-by-Step Guide).
Advanced Drainage and Maintenance
While a standard extension works for many, some yards require more advanced solutions. In Central Ohio, our clay-heavy soil doesn’t always absorb water quickly, which can lead to “swampy” spots in the lawn.
Underground Downspout Extensions
Burying your downspouts is the ultimate way to keep your yard looking clean while moving water far away. This involves connecting your downspout to a solid PVC pipe that runs underground to a “bubbler” pot or a French drain.
- The Frost Line: In our region, the frost line can reach 32-48 inches deep. While you don’t necessarily need to bury your pipes that deep, you must ensure they have a consistent downward slope (at least 1/8 inch per foot) so water doesn’t sit in the pipe and freeze, which could cause the pipe to burst.
- Catch Basins: Installing a catch basin about 3 feet from the house can help trap shingle grit and debris before it enters your underground pipes.
Rain Barrels and Harvesting
If you’re an avid gardener, consider a rain barrel. You can install a diverter into your downspout that fills a barrel during rain. Just make sure the barrel has an overflow outlet that directs excess water away from the foundation once the barrel is full.
Maintenance and Clog Prevention
Even the best downspouts installation will fail if it’s full of maple seeds and oak leaves. We recommend cleaning your system at least twice a year—once in late spring and once in late fall.
- Gutter Guards: Integrating high-quality gutter guards can virtually eliminate the need for downspout cleaning. By keeping debris out of the gutter, you ensure the downspout only has to handle water.
- Pest Prevention: In Central Ohio, squirrels and birds love to nest in open downspouts. Installing a small mesh screen at the top (or using a guard) prevents these unwanted guests.
To learn more about how we handle these challenges, visit our About Us page. For more on burying lines, see How to Extend a Downspout – This Old House.
Frequently Asked Questions about Downspouts
How many downspouts do I need for my home?
As mentioned, the standard is one downspout for every 30-40 feet of gutter. However, if your roof has a very steep pitch (which causes water to run off faster), you should increase the number of downspouts. A 1,500 sq. ft. home typically requires 3 to 5 downspouts depending on the roof’s complexity.
How far should downspouts extend from the foundation?
At a bare minimum, water should discharge 5 feet away from the foundation. If you have a basement or live in an area with poor soil drainage, 10 feet is much safer. If your yard slopes back toward the house, an underground system is often the only way to meet these requirements effectively.

What is the average cost of downspout installation?
If you go the DIY route, materials typically cost between $150 and $350 for a standard home. Professional installation usually ranges from $150 to $500 per downspout, depending on the height of the home and the complexity of the drainage (such as underground work). While DIY saves money upfront, a professional installation ensures the slope and sealing are perfect, which can save you thousands in foundation repairs later.
Conclusion
At K Guard Central Ohio, we’ve seen how a small mistake in downspouts installation can lead to massive structural problems. Whether you choose to tackle this as a weekend project or hire a professional, the goal remains the same: keeping your home’s foundation dry and secure.
Properly installed downspouts are the unsung heroes of home maintenance. They protect your siding from splashes, your basement from floods, and your landscaping from erosion. If you’re feeling overwhelmed by the technicalities of gutter slopes and wall offsets, we’re here to help. Our team specializes in high-capacity, leaf-free systems that take the guesswork out of drainage.
Ready to protect your home for the long haul? Contact Us today for a consultation, or Schedule Your Professional Downspout Installation to ensure your home is ready for the next Ohio downpour!