DIY Guide to Installing Rain Gutters on a House
What You Need to Know Before Installing Rain Gutters on a House
Installing rain gutters on a house is one of the most impactful home improvement projects you can tackle. Done right, it protects your foundation, siding, and landscaping from costly water damage for decades.
Here’s a quick overview of the process:
- Plan your layout — measure eaves, mark downspout locations, and inspect fascia
- Set the slope — snap a chalk line with a ¼-inch drop per every 10 feet toward each downspout
- Install hangers — space them every 18–24 inches, fastened into rafter tails
- Cut and join sections — overlap by at least 4 inches in the direction of water flow
- Attach end caps and outlets — seal every joint with gutter-rated sealant
- Mount downspouts — strap to the wall every 4–6 feet, discharging water at least 6 feet from the foundation
- Test the system — run a hose from the high end and check for leaks or pooling
Most homeowners with basic DIY skills can complete a single-story installation in a weekend. If you’d prefer a system that features a lifetime guarantee, the complete elimination of annual gutter cleaning, and a $5,000 average installation cost, K-Guard Central Ohio’s professionally installed covered gutter system is the ultimate worry-free solution.
Without gutters, rainwater falls directly off the roofline and pools near your foundation. Over time, that leads to soil erosion, basement leaks, fascia rot, and expensive structural repairs. As one industry saying goes: a new roof without good gutters is like locking your front door but leaving the windows wide open.
I’m Rich Mannino, General Manager of K-Guard Leaf Free Gutters, and I’ve spent nearly two decades helping homeowners solve the real-world challenges of installing rain gutters on a house — from basic DIY sectional systems to fully covered, maintenance-free solutions. In this guide, I’ll walk you through everything you need to plan, size, and install gutters correctly the first time.

Installing rain gutters on a house vocab explained:
Why Gutters Matter Before You Start
Before climbing a ladder or purchasing materials, it is essential to understand why a properly functioning gutter system is critical to your home’s health. In Central Ohio, we experience a wide variety of weather patterns—from heavy spring downpours to freezing winter snow and ice. Without an effective way to manage roof runoff, water will find its way into places it does not belong.
When rainwater rolls off a roof without gutters, it falls directly next to the home’s foundation. Over time, this concentrated pooling causes soil erosion, washes away expensive landscaping, and oversaturates the ground. This saturated soil exerts immense hydrostatic pressure on your foundation walls, leading to cracks, basement leaks, and damp crawlspaces.
Furthermore, uncontrolled splashing stains siding, rots fascia boards, and damages trim. In the winter, standing water at the roofline freezes, contributing to ice dams and structural rot. To prevent these issues, How-to overview from This Old House emphasizes that a well-pitched gutter system is a home’s first line of defense against structural deterioration.
Main Benefits of a Working Gutter System
A professionally installed or properly executed DIY gutter system offers several key benefits:
- Foundation Protection: By collecting water at the roofline and directing it away, gutters prevent soil saturation and protect the structural integrity of your foundation.
- Basement and Crawlspace Dryness: Directing roof runoff away from the home’s perimeter is the single most effective way to eliminate basement flooding and moisture problems.
- Siding and Trim Preservation: Gutters prevent dirty water from splashing back onto your siding, reducing mold, mildew, and paint peeling.
- Landscaping Safeguards: Heavy runoff can wash away mulch beds, carve deep trenches in your lawn, and drown expensive plants. Gutters keep your yard looking pristine.
- Fascia and Soffit Integrity: Properly hung gutters keep water from backing up behind the drip edge, protecting the wood from rot and decay.
When Gutters Need Replacement Instead of Repair
How do you know if your existing gutters can be salvaged or if it is time to start from scratch? While minor leaks can occasionally be patched, certain signs indicate that your home requires a complete replacement:
- Sagging and Pulling Away: If your gutters are sagging or pulling away from the fascia, the wood underneath may be rotted, or the original hangers may have failed.
- Widespread Rust and Cracks: Once metal gutters begin to rust through or show multiple cracks, patching is only a temporary band-aid.
- Separated Seams: If your sectional gutters are constantly separating at the joints, the system is reaching the end of its functional life.
- Water Pooling in the Troughs: This indicates either an improper original slope or permanent warping of the gutter channels.
- Frequent Overflowing: If your gutters overflow despite being clean, they are likely undersized for your roof pitch or rainfall levels.
If you find yourself constantly dealing with these issues, or if you are tired of risk-heavy, bi-annual cleanouts, upgrading to an integrated K-Guard covered gutter system is often the most reliable, long-term solution.
Planning for Installing Rain Gutters on a House
A successful installation starts on the ground. Rushing into the project without a clear layout plan is the most common reason DIY gutter systems fail, leak, or look crooked from the street.
To plan your system, sketch your home’s roofline from a bird’s-eye view. Walk around the perimeter and measure the exact length of each eave where a gutter will be installed (gable ends, where the roof slopes upward, do not require gutters). Note where corners, valleys, and existing downspouts are located.
During this planning phase, inspect your fascia boards. If you find any soft, rotted, or water-damaged wood, replace it before hanging new gutters. Trying to mount gutters to rotted wood guarantees the fasteners will pull out under the weight of water or snow. Additionally, check local building codes or homeowner association regulations, and plan your downspout discharge paths to ensure water is routed safely away. For a comprehensive look at planning your drainage, read The Complete Guide to Gutter Downspouts.
Choosing Gutter Type, Profile, and Size
When installing rain gutters on a house, you must choose the right material, shape (profile), and size for your home’s needs. The most common residential profile is the K-style gutter, which mimics decorative crown molding. For historic homes, half-round gutters offer a classic look but require specialty brackets.
| Gutter System | Average Lifespan | Maintenance Level | Clog Resistance | Estimated Cost |
|---|---|---|---|---|
| DIY Sectional Vinyl | 10–15 Years | Very High (Frequent leaks/clogs) | Low | $1–$2 per linear foot (Materials) |
| DIY Sectional Aluminum | 20–30 Years | High (Requires sealing/cleaning) | Low | $3–$8 per linear foot (Materials) |
| K-Guard Covered System | Lifetime | None (Self-cleaning design) | Extremely High | $5,000 (Average professional install) |
While vinyl is inexpensive and easy to cut, it becomes brittle in freezing Central Ohio winters and has a shorter lifespan. Aluminum is the industry standard for residential homes because it does not rust, is lightweight, and lasts 20 to 30 years. However, traditional DIY aluminum gutters come in 10-foot sectional pieces, meaning they will have seams that eventually leak.
For complete peace of mind, our K-Guard covered gutter system features a seamless, high-capacity design with an integrated hood that sheds leaves and debris. It eliminates the risk of leaks and clogs entirely, backed by a lifetime warranty.
How to Size Gutters and Place Downspouts
Standard residential gutters are 5 inches wide, which handles the runoff for most average-sized homes. However, if you have a steep roof pitch, large valleys where two roofs meet, or experience heavy rainstorms, upgrading to 6-inch gutters provides much-needed capacity.
Downspout placement is equally critical. A standard rule of thumb is to install one downspout for every 30 to 40 feet of gutter run. If you have a roofline longer than 40 feet, you should plan to place a downspout at both ends, sloping the gutter downward from the center point.
Always locate downspouts near corners or valleys where water naturally concentrates. Ensure that your downspouts discharge water onto splash blocks or downspout extensions that carry the water at least 5 to 10 feet away from your foundation.
Correct Pitch for Installing Rain Gutters on a House
Gutters cannot run perfectly horizontal; they must slope downward toward the downspouts so water flows smoothly instead of pooling. The industry standard is a minimum slope of ¼ inch of drop for every 10 feet of gutter run.
High End (0") -----------------------------\
 \---> Low End (1/4" drop per 10 feet)
If your gutter run is 30 feet long, the downspout end must be ¾ of an inch lower than the starting high point. If a gutter lacks proper pitch, water will stand in the trough, creating a breeding ground for mosquitoes, rusting metal fasteners, and causing the gutter to sag under the constant weight of standing water. Conversely, too much slope will cause water to overshoot the downspout opening during heavy rain and look visually unappealing from the curb.
Tools, Materials, and Safety for a DIY Gutter Installation
Before you begin, gather all the necessary tools and materials on-site. Having the right equipment ensures the job goes smoothly and prevents repeated trips to the hardware store.
Tools and Materials for Installing Rain Gutters on a House
To complete a standard DIY sectional gutter installation, you will need the following items:
Essential Tools:
- Extension ladder with a stabilizer (ladder standoff)
- Chalk line and tape measure
- Cordless drill and hex driver bits
- Tin snips (left and right aviation snips)
- Hacksaw or miter saw with a metal-cutting blade
- High-quality level (at least 2 feet long)
- Gutter crimper and pop riveter
- Caulking gun
Required Materials:
- Gutter sections (typically 10-foot lengths)
- Hidden hangers or fascia brackets
- Inside/outside corner miters (if applicable)
- Gutter end caps (left and right)
- Downspout outlets (drop tubes)
- Downspout elbows (A-style and B-style)
- Downspout piping and wall straps
- Stainless steel or rust-resistant hex-head screws
- Pop rivets
- Polyurethane-based gutter sealant
For more detailed material calculations, refer to this DIY gutter installation checklist. While sectional systems can be completed using these tools, specialized covered systems like K-Guard require professional fabrication and installation to maintain their structural lifetime warranty.
Safety Precautions When Installing Rain Gutters on a House
Working at heights is inherently dangerous. Safety must be your top priority throughout this project.
- Inspect Your Ladder: Ensure your extension ladder is on firm, level ground. Always use a ladder stabilizer (standoff) to prevent crushing your gutters and to provide a wider, safer support base against your roof or siding.
- Maintain Three Points of Contact: When climbing, always keep two hands and one foot, or two feet and one hand, on the ladder. Never overreach; move the ladder instead.
- Work with a Partner: Never install gutters alone. Have a helper on the ground to steady the ladder, pass up tools, and assist with handling long, awkward gutter sections.
- Watch for Power Lines: Maintain a distance of at least 10 feet from any overhead power lines. Aluminum gutters conduct electricity easily.
- Wear Protective Gear: Always wear heavy-duty work gloves when handling cut metal, as the edges are razor-sharp. Wear safety glasses when drilling and cutting.
If you have a two-story home, a steep roof pitch, or feel uncomfortable working on a ladder, do not risk your safety. This is the ideal time to step back and call a professional.
DIY Cost vs. Professional K-Guard Installation
While purchasing basic sectional materials at a home improvement store may cost between $3 and $8 per linear foot, those savings come at a cost. DIY systems require your time, physical labor, and ongoing maintenance. Because sectional gutters have seams every 10 feet, they will eventually leak, requiring you to climb back up to clean, scrape, and re-seal the joints every few years.
By contrast, the K-Guard covered gutter system is a professional, seamless solution. With an average installation cost of $5,000, K-Guard offers an unmatched lifetime guarantee. Because it is completely enclosed, it totally eliminates annual gutter cleaning. You will never have to risk your safety on a ladder to clear wet leaves, pine needles, or muck again.
Step-by-Step Rain Gutter Installation
If you have decided to tackle a standard sectional installation yourself, follow these step-by-step instructions carefully to ensure a watertight, durable result. For additional context, you can also watch this helpful video on How to Install a Rain Gutter | Ask This Old House – YouTube.
Step 1: Inspect Fascia and Map the Layout
Before installing anything, clean your existing fascia boards and inspect them for rot, mold, or structural soft spots. If any wood is damaged, replace it immediately.
Next, map out your layout. Measure the total length of the roofline runs and mark where your downspouts will go. Make a sketch of your home to calculate how many gutter sections, hangers, end caps, and elbows you need. Remember to buy about 10% more material than your exact measurements to account for cuts and mistakes. For more background on planning your installation, check out our Homeowner installation guide.
Step 2: Mark the Slope and Install Hangers
To establish your slope, find the highest point of your gutter run (typically the corner furthest from the downspout) and make a mark on the fascia board about 1 ¼ inches below the metal drip edge.
Next, go to the downspout location and calculate the drop. For example, on a 20-foot run, you need a ½-inch drop. Mark this low point on the fascia. Drive a nail into your high and low marks, stretch a chalk line between them, and snap it. This line will guide your hanger placement.
Locate your roof’s rafter tails behind the fascia (usually spaced 16 or 24 inches apart). Mount your hidden hangers or fascia brackets along the chalk line, driving long, rust-resistant screws through the fascia directly into the rafter tails for maximum holding power. In Central Ohio, where heavy snow and ice are common, we recommend spacing hangers every 18 to 24 inches to prevent sagging under heavy winter loads.
Step 3: Cut, Join, and Cap Gutter Sections
It is much easier to assemble your gutter sections on the ground before hanging them. Measure your dry-fit runs and cut the aluminum or vinyl sections to length using a hacksaw or miter saw.
If you need to join two sections together to span a long wall, overlap them by at least 4 to 8 inches. Ensure that the section upstream overlaps inside the downstream section so water flows smoothly over the seam rather than catching on the edge. Secure the seam along the sides with pop rivets or short sheet-metal screws—never place fasteners in the bottom of the gutter, as they will catch debris and cause leaks. Apply a generous bead of high-quality, polyurethane-based gutter sealant over the seam and fasteners on the inside of the trough.
Next, attach your end caps. Slide the end caps onto the open ends of your gutter runs, secure them with rivets or screws, and seal the inside joints thoroughly with sealant.
Step 4: Cut Downspout Outlets and Handle Corners
At your downspout locations, turn the gutter upside down. Place a downspout outlet (drop tube) on the bottom of the gutter to use as a template and trace around it.
Use a drill and a 4-inch hole saw, or drill a starter hole and use aviation snips to cut out the opening. Insert the outlet tube from the inside of the gutter, securing it with rivets from the outside. Seal around the flange on the inside of the gutter to prevent water from dripping.
To handle corners, use pre-made inside or outside corner miters (strip miters). Join the gutter sections to the miter on the ground, secure the joints with rivets, and apply a heavy bead of gutter sealant along the inside seams. For a detailed guide on downspout placement, see our article on How to Install Downspouts in 5 Simple Steps.
Step 5: Mount Gutters, Attach Downspouts, and Direct Water Away
With your helper, lift the assembled gutter section up to the fascia. Slip the back edge of the gutter under the metal drip edge or gutter apron, rotate the front lip into the hooks of your pre-installed fascia brackets, and lock them securely into place.
Once the gutters are mounted, assemble your downspouts. Connect an elbow to the downspout outlet at the bottom of the gutter, and use another elbow to transition the piping back against your home’s siding. Secure the downspout sections together using short screws.
Attach the downspout to your siding using U-shaped wall straps. Use at least two straps for a single-story home and three straps for a two-story home, spacing them every 4 to 6 feet. At the bottom of the downspout, attach an elbow and a downspout extension to direct water at least 5 to 10 feet away from your foundation.
Step 6: Seal Joints and Test the System
Once your entire system is hung, double-check all seams, end caps, and outlets. Ensure the metal surfaces are completely dry, and apply a final layer of gutter sealant over any exposed joints or fasteners.
Allow the sealant to cure for at least 12 to 24 hours (refer to your product’s instructions). Once cured, perform a hose test. Place a garden hose at the highest point of the gutter run and turn on the water. Watch the water flow to ensure it drains smoothly toward the downspouts without pooling, overflowing, or leaking at the seams. If you notice water pooling, adjust your hanger heights slightly to correct the slope.
K-Guard Upgrades, Maintenance, and When to Hire a Pro
While a standard DIY gutter system is a solid home improvement project, it still leaves your home vulnerable to clogs from leaves, twigs, and shingle grit. To truly protect your property, upgrading to a covered system is the ultimate solution.
Adding a K-Guard Covered Gutter System for Long-Term Protection
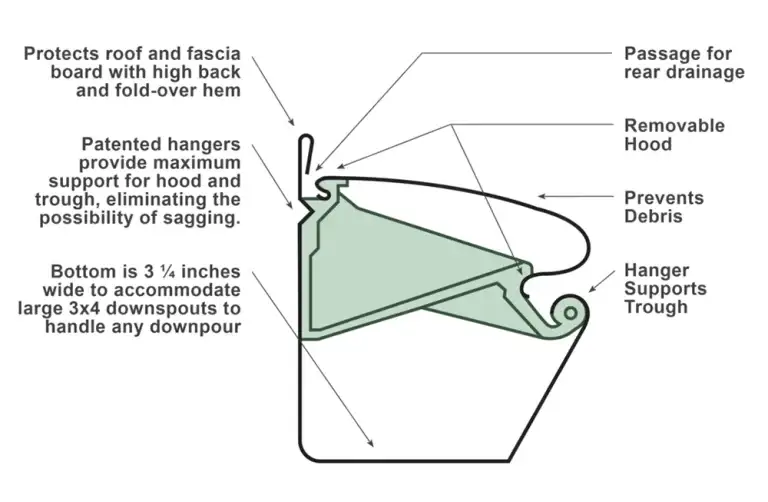
The K-Guard leaf-free gutter system is designed to completely eliminate the chore of gutter cleaning. Unlike aftermarket gutter guards that sit on top of old, sagging gutters, K-Guard is a fully integrated, high-capacity system.
It features a patented hood that utilizes liquid adhesion to draw rainwater into the gutter trough while shedding leaves, pine needles, and debris over the edge. Built from heavy-duty aluminum, it attaches to your rafter tails with high-strength, patented hangers that prevent sagging. Best of all, it comes with a lifetime clog-free guarantee and averages around $5,000 for a complete home installation.
Directing Downspout Water Safely Away From the Home
No matter what gutter system you choose, proper water discharge is non-negotiable. Ensure your downspout extensions are clear and direct water onto splash blocks or into underground drainage pipes that route water away from basement walls. Regularly check these discharge areas after heavy storms to prevent soil erosion and ensure the grading slopes away from your home.
Maintenance Schedule After Installation
If you choose to stick with standard open gutters, you must commit to a regular maintenance schedule:
- Twice-Yearly Cleanings: Clean your gutters at least twice a year—once in the spring and once in the late fall—to remove leaves, seeds, and debris.
- Inspect Joints and Sealant: Check your seams and end caps annually for cracking sealant, and re-apply gutter caulk as needed.
- Check for Sagging: Inspect your hangers after heavy snowfalls or windstorms to ensure they remain securely fastened to the fascia.
- Flush Downspouts: Run a hose down your downspouts to clear out any compacted debris or clogs.
If you want to avoid this dangerous, time-consuming maintenance altogether, the K-Guard system is the perfect alternative, requiring zero annual cleaning.
When to Hire a Professional Instead of DIY
While a simple, straight gutter run on a single-story ranch home is a manageable DIY project, you should hire a professional if:
- Your home is two or more stories high.
- Your roof has a steep pitch or complex valleys.
- Your fascia boards are rotted and require extensive structural repair.
- You want seamless gutters, which require specialized on-site roll-forming machinery.
- You want a system backed by a lifetime warranty.
To find a trustworthy installer, read our guide on Hiring a Gutter Contractor: What You Need to Know Before You Install. If you are ready to let the pros handle it, learn more about our Installation services.
Frequently Asked Questions About Installing Rain Gutters
What is the recommended gutter slope?
The industry standard is a minimum of ¼ inch of drop for every 10 feet of gutter run toward the downspout. For a 40-foot run, the downspout end should be 1 inch lower than the high end. Proper slope prevents standing water, which attracts mosquitoes and causes structural sagging.
How many downspouts does a house need?
As a general rule, you need one downspout for every 30 to 40 feet of gutter. Larger roof areas, steep pitches, or sections with deep valleys may require additional downspouts or larger 3×4-inch downspouts to handle heavy rainfall.
Can K-Guard eliminate annual gutter cleaning?
Yes! The K-Guard covered gutter system is designed with a patented hood that keeps leaves, pine needles, and debris out of your gutters entirely. It comes with a lifetime clog-free guarantee, completely eliminating the need for annual gutter cleaning and ladder work.
Conclusion
Installing rain gutters on a house is a critical step in protecting your home from foundation damage, basement flooding, and costly structural rot. Whether you choose to tackle a sectional DIY installation over a weekend or invest in a premium, worry-free upgrade, managing roof runoff is essential for long-term home preservation.
If you are ready to say goodbye to clogged gutters, leaky seams, and dangerous ladder work forever, we are here to help. K-Guard Central Ohio offers a heavy-duty, fully integrated covered gutter system that averages around $5,000 and comes with a lifetime clog-free guarantee.
Protect your home and your peace of mind—Schedule professional gutter installation with K Guard Central Ohio today!