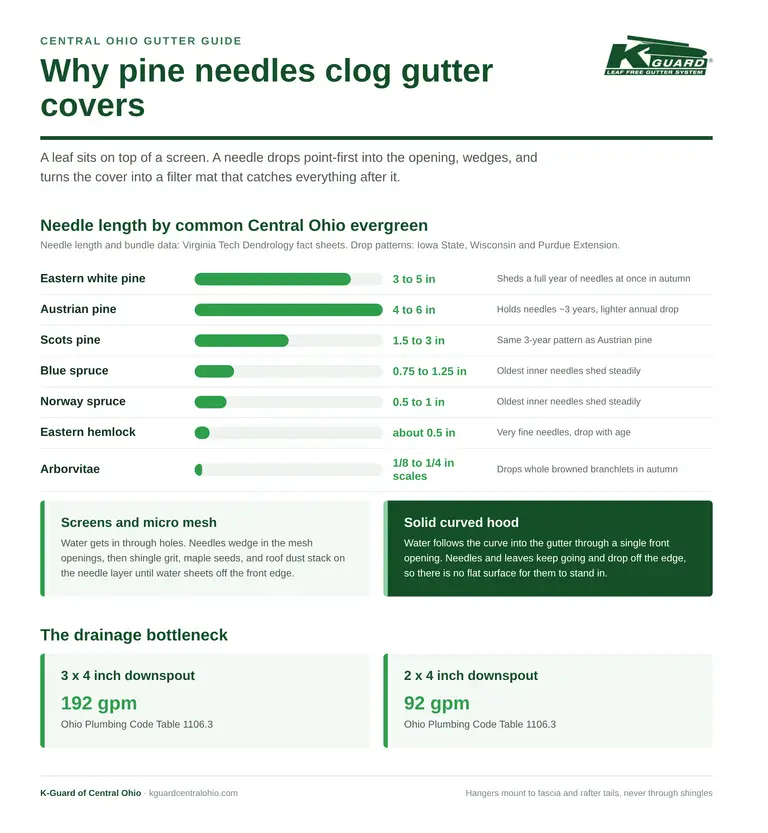
DIY Gutter Installation: Step-by-Step PDF Guide for Homeowners
What Every Homeowner Needs to Know Before Using a Gutter Installation Guide PDF
A gutter installation guide PDF gives you the step-by-step instructions you need to plan, measure, and install a complete gutter system on your home. Here’s a quick overview of what the process involves:
Quick-Start Gutter Installation Checklist:
- Measure the roofline (not the house perimeter) to calculate materials
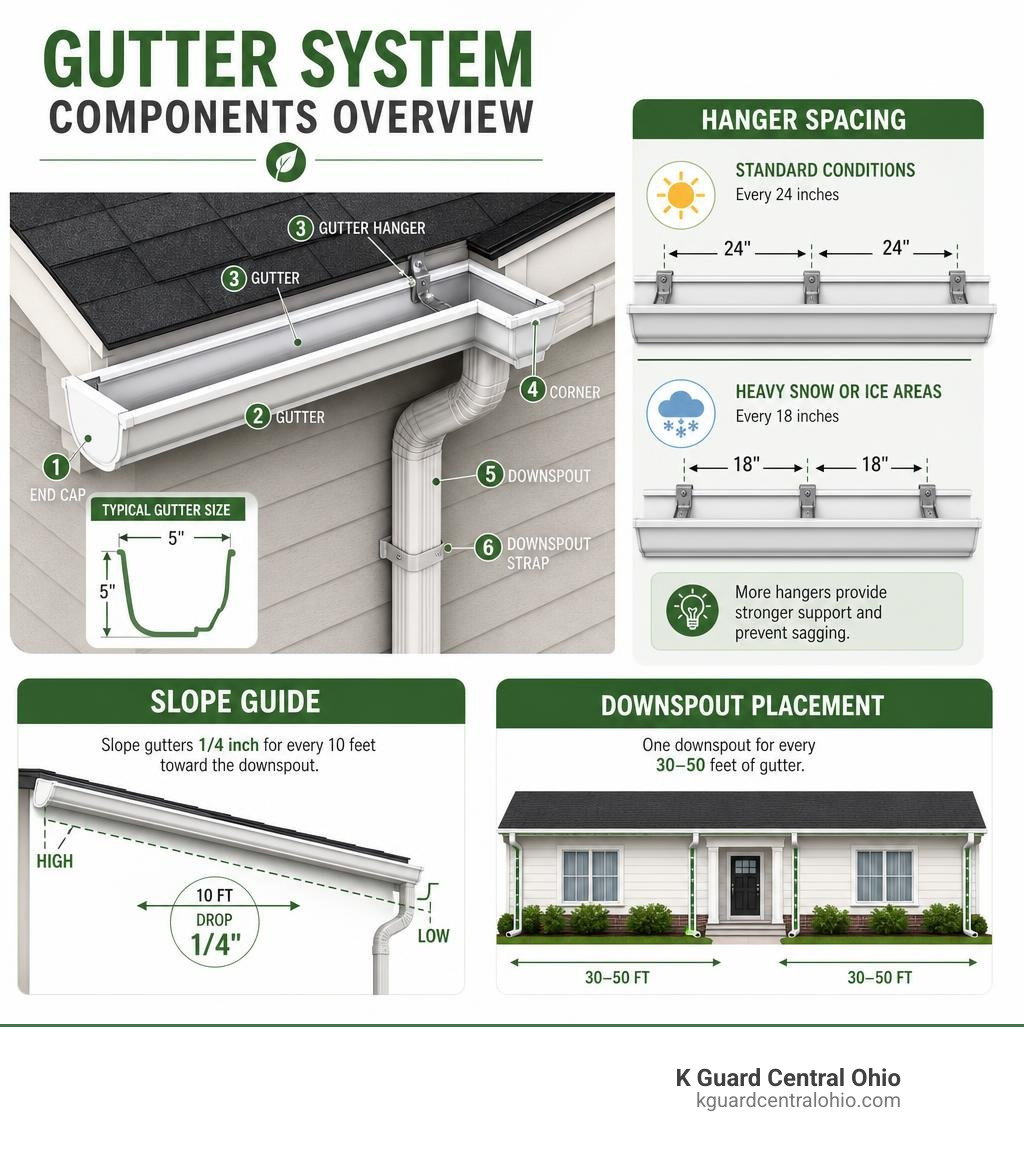
- Plan downspout locations — one per every 30–50 feet of gutter
- Snap a chalk line on the fascia with a slope of 1/4 inch per 10 feet toward the downspout
- Install gutter hangers every 2 feet (every 18 inches in heavy snow or ice areas)
- Join gutter sections with a minimum 3-inch overlap and sealant at all connection points
- Attach downspouts with at least two straps per 10-foot section
- Add gutter guards to reduce debris buildup and long-term maintenance
Gutters protect your home’s foundation, fascia, and landscaping from water damage. A poorly installed system — wrong slope, too few hangers, misaligned downspouts — can cause thousands of dollars in damage over time. Getting the installation right from the start matters.
I’m Rich Mannino, General Manager of K-Guard Leaf Free Gutters, and after nearly two decades working with gutter systems, I’ve seen where DIY installs succeed and where they fall short — which is exactly why a reliable gutter installation guide PDF is so valuable for homeowners tackling this project. In the sections below, I’ll walk you through everything from gutter types and sizing to gutter guard installation techniques so you can make confident, informed decisions. Plus, I’ll explain why many homeowners ultimately choose a professional system with a lifetime guarantee that eliminates annual gutter cleaning for an average installation cost of around $5,000.
Gutter installation guide pdf further reading:
Understanding Gutter Types, Sizes, and System Planning
Before we pick up a hammer or scale a ladder, we have to understand the anatomical makeup of a residential gutter system. Not all gutters are created equal, and choosing the wrong style or size for our Central Ohio climate can lead to premature system failure.
Selecting the Right Gutter Style and Size
The two most common profiles you will encounter in any standard gutter installation guide PDF are:
- K-Style Gutters: The modern standard across North America. They feature a decorative crown-molding appearance on the front face, allowing them to blend seamlessly with traditional home trim. They carry more water than half-round gutters of equivalent width.
- Half-Round Gutters: Shaped like a simple U-tube, these are commonly reserved for historic homes or European-style architecture. While beautiful, they require specialized curved hangers and are more prone to overflow during severe downpours.
When it comes to sizing, standard residential applications typically call for 5-inch gutters, while larger homes, steep-pitch roofs, or light commercial properties benefit from 6-inch gutters. To put their performance into perspective, a standard 2×3-inch downspout paired with a 5-inch gutter can drain up to 186 gallons of water per minute. Stepping up to a 6-inch system with 3×4-inch downspouts increases that drainage capacity to an impressive 434 gallons per minute. If you are researching costs, you can read our breakdown of 5-Inch Seamless Gutters: What You Need to Know About Pricing or check out our general Cost of New Gutters 101 guide.
Planning and Calculations
We must always measure the actual roofline, not the house footprint, to determine our material needs. Roof overhangs and complex gables can alter our measurements significantly.
Once we have our total linear footage, we apply these standard industry rules:
- Hanger Spacing: Gutter hangers should be installed every 2 feet (24 inches) for optimal support to prevent sagging under water weight. In areas prone to heavy snow and ice, we reduce this spacing to every 18 inches.
- Downspout Spacing: Downspouts should be installed for every 30 to 50 feet of gutter length to ensure proper drainage.
- Section Overlaps: When joining two sectional gutter pieces together, they require a minimum 3-inch overlap to maintain water tightness and structural integrity.
To learn more about calculating materials for your layout, check out our DIY Guide to Installing Rain Gutters on a House or consult this comprehensive [PDF] Gutters Installation Guide.
Step-by-Step Gutter Installation Guide PDF Instructions
With our planning complete, we can move into the physical installation process. Taking our time during these steps ensures our gutters won’t sag, leak, or pull away from the home.
Essential Tools and Safety Precautions
Do not start this project without the proper safety gear and equipment. You will need:
- An extension ladder with a high-quality ladder standoff (to avoid crushing the new gutters)
- Personal Protective Equipment (PPE) including thick work gloves, safety glasses, and sturdy work boots
- A chalk line, tape measure, level, hacksaw or high-quality tin snips, drill, and screwdriver
- Rust-resistant self-tapping screws and high-grade gutter sealant (such as SeamerMate)
Safety Note: Always check for overhead power lines before raising your ladder. Never work in wet, windy, or icy conditions.
Step 1: Establish the Slope
Gutters cannot be installed completely level; they must slope downward toward the downspouts to allow water to flow. We establish this slope by snapping a chalk line on our fascia board.
- Locate the highest point of the gutter run (usually the corner farthest from the downspout). Mark a point 1/2 inch below the roofline or drip edge.
- Go to the downspout location. Calculate the slope by dropping the line 1/4 inch for every 10 feet of gutter run. For example, a 40-foot run requires a 1-inch drop. Mark this lower point on the fascia.
- Snap a chalk line between these two marks to create a perfect guide path.
Step 2: Assemble Components on the Ground
It is much easier to assemble as many components as possible on the ground before lifting the heavy gutter sections into place.
- Cut your gutter sections to length using a hacksaw or tin snips.
- If you are joining two sections, overlap them by at least 3 inches, apply a generous bead of SeamerMate sealant, and secure them with pop rivets or short sheet metal screws.
- Cut out the downspout opening. Trace the outline of the drop outlet onto the gutter floor, drill a pilot hole, and use tin snips to cut out the opening. Insert the outlet from the inside and seal around the rim.
- Attach your end caps to the ends of the gutter runs. If using vinyl, snap them on using the built-in rubber seals. For metal gutters, crimp them into place and seal the interior seams thoroughly.
Step 3: Mount the Hangers and Hang the Gutters
With our pre-assembly finished, we can mount our hangers. If you are using hidden hangers, slip them inside the gutter’s front lip and space them every 24 inches. Lift the gutter assembly up to the fascia board, aligning the top rear edge with our snapped chalk line. Drive the heavy-duty screws through the hangers, straight through the fascia board, and into the solid rafter tails behind it.
Step 4: Install the Downspouts
For our downspouts, we assemble the elbows and straight sections on the ground.
- Connect the top elbow to the gutter’s drop outlet.
- Measure and cut the downspout length so it hugs the side of the house snuggly. Always ensure the smaller crimped end of each section points downward, facing inside the lower section. This keeps the water flowing inside the pipe rather than leaking out of the seams.
- Secure the downspout to the wall using at least two brackets or straps for every 10 feet of downspout length.
- Direct the exit elbow onto a splash block or connect it to an underground drain pipe to lead water away from your foundation.
To master this step, read our guide on How to Install Downspouts in 5 Simple Steps and explore The Complete Guide to Gutter Downspouts. For a detailed visual guide of this process, you can watch How to Install a Rain Gutter | Ask This Old House – YouTube, review the manufacturer specifications on Installing, or check out Gutter Installation – Professional Gutter & Drain Ltd. for additional professional layout ideas.
Gutter Guard Installation: Methods, Materials, and Custom Adjustments
Once your gutters are securely hung, adding a gutter guard or filtration panel system is the next logical step to reduce maintenance. Gutter guards can cut down your annual gutter cleaning frequency by up to 75%.
Choosing Your Attachment Method
How you secure your gutter guards depends on your local climate, budget, and comfort level with tools. The two primary methods are high-bond adhesive tape (like 3M VHB tape) and mechanical self-tapping screws.
| Securing Method | Pros | Cons |
|---|---|---|
| 3M VHB Tape | No drilling required; clean look; excellent for DIYers who want a fast install. | Requires warm weather (65°F+) to cure; needs 12 hours of dry weather; requires meticulous surface cleaning. |
| Self-Tapping Screws | Extremely secure; commercial-grade wind resistance; can be installed in any temperature. | Requires a drill; leaves permanent holes; slightly visible screw heads along the front lip. |
Adjusting for Pitch and Surface Irregularities
Standard gutter guards perform best when installed at a slope of 5 to 25 degrees, allowing dry leaves to blow off naturally in a light breeze. However, steep-pitch roofs present a unique challenge: if the guard is installed at the same steep angle as the roof, rainwater will rush straight over the top of the gutter.
To prevent this “waterfall” effect on steep roofs:
- We must bend the rear edge of the mesh guard up or down to achieve a flatter, 5-to-10-degree slope.
- We must ensure the stainless steel mesh trough sits at least 1/8 inch below the front lip of the gutter.
- Keep all weep holes completely unobstructed so heavy rainwater can drain into the gutter rather than pooling on top.
Under-the-Shingle Gutter Installation Guide PDF Methods
The under-the-shingle method is the most common approach for standard asphalt shingle roofs.
- Gently slide the back edge of the gutter guard panel under the first row of shingles. Avoid “roof ramping” — prying the shingles up too high can break the sealant bond, damage the roof deck, and potentially void your shingle warranty.
- Position the front edge of the panel over the gutter’s front lip.
- Push down firmly to remove any gap between the guard’s front rail and the gutter lip.
- Secure the front edge to the gutter lip using three self-tapping screws per 4-foot panel (placed roughly 1 inch from each end and one in the center).
If you are using drop-in plate systems like GutterShed, you will use specialized GutterHooks to snap the plates directly onto the gutter lip, allowing the upper edge to rest flat on the shingles. In high-wind areas, we recommend adding small vinyl tubing caps over the points of the hooks to prevent wind uplift.
Fascia-Mount and Specialty Roof Gutter Installation Guide PDF Techniques
If your home has a metal roof, slate tiles, wood shakes, or a screen room/pool cage, you cannot slide guards under the shingles. Doing so would damage the roofing material or be physically impossible.
In these cases, we use a fascia-mount or below-the-roofline installation:
- Measure the distance from the gutter’s front lip to the fascia board.
- Using a sheet metal hand brake, create a clean 90-degree vertical bend along the back edge of the gutter guard panel.
- Apply high-quality seal tape along this bent vertical leg.
- Screw the bent leg directly into the fascia board or the back wall of the gutter, creating a sealed, downward-sloping shield.
For sloped or irregular fascia boards, specialized hardware like adaptive triangles can be used to mount brackets at precise 10, 20, 30, or 40-degree angles. If you are working with premium materials like zinc gutters, always consult the GUTTERING-EXPERT.CO.UK INSTALLATION INSTRUCTIONS to account for thermal expansion gaps. Zinc and other specialty metals expand and contract significantly; failing to leave a 5 mm gap between sections can cause the system to buckle.
Frequently Asked Questions about Gutter Installation
How do you calculate the correct slope for a gutter system?
To calculate the correct slope, we drop the gutter line 1/4 inch for every 10 feet of horizontal run toward the downspout. For example, if you have a straight 20-foot gutter run, the downspout end should sit exactly 1/2 inch lower than the starting corner. If your gutter run is longer than 40 feet, it is best to slope the gutter downward from the center toward a downspout on each end.
What is the difference between 5-inch and 6-inch gutters?
The difference lies in their water-handling capacity. A standard 5-inch K-style gutter is the residential baseline, perfectly capable of handling normal rainfall on average-sized roofs. A 6-inch gutter holds about 40% more water and is designed for larger residential roofs, steep pitches, or commercial buildings where heavy downpours would otherwise overshoot a smaller system.
How often should gutter hangers and downspouts be spaced?
Gutter hangers should be spaced a maximum of 2 feet (24 inches) apart to prevent the gutter from sagging when filled with water, leaves, or ice. Downspouts should be installed every 30 to 50 feet of gutter length to ensure water drains quickly enough to prevent the system from overflowing.
Conclusion: Why a Professional System Outperforms DIY
Tackling a gutter installation yourself can be a rewarding weekend project, but it is not without its risks. Climbing tall ladders, handling razor-sharp metal, calculating precise slopes, and avoiding roof damage requires physical stamina and absolute precision. Furthermore, even the best DIY gutter guards are not truly maintenance-free; they still require you to climb a ladder periodically to brush off stubborn pine needles, pollen, and debris.
If you are looking to skip the ladder climbs altogether, a professional, fully integrated system is your best choice. At K Guard Central Ohio, we offer a specialized leaf-free gutter guard system designed to handle the heaviest storms our region can throw at it.
Unlike DIY add-ons, our system is fully integrated, built from heavy-duty aluminum, and features a patented hood design that completely prevents leaves, twigs, and pests from entering. We back our product with a lifetime clog-free guarantee, completely eliminating the need for annual gutter cleaning. With an average house installation cost of approximately $5,000, we provide homeowners in Central Ohio with a permanent, worry-free solution that protects their homes for a lifetime.
Ready to retire your ladder for good? Contact K Guard Central Ohio today for a free estimate and professional installation.
Planning your budget? Explore our cost guides: