How to Install Gutters in 7 Easy Steps
Why Understanding the Gutter Installation Process Protects Your Home
The gutter installation process is something every homeowner should understand — whether you plan to DIY or hire a pro.
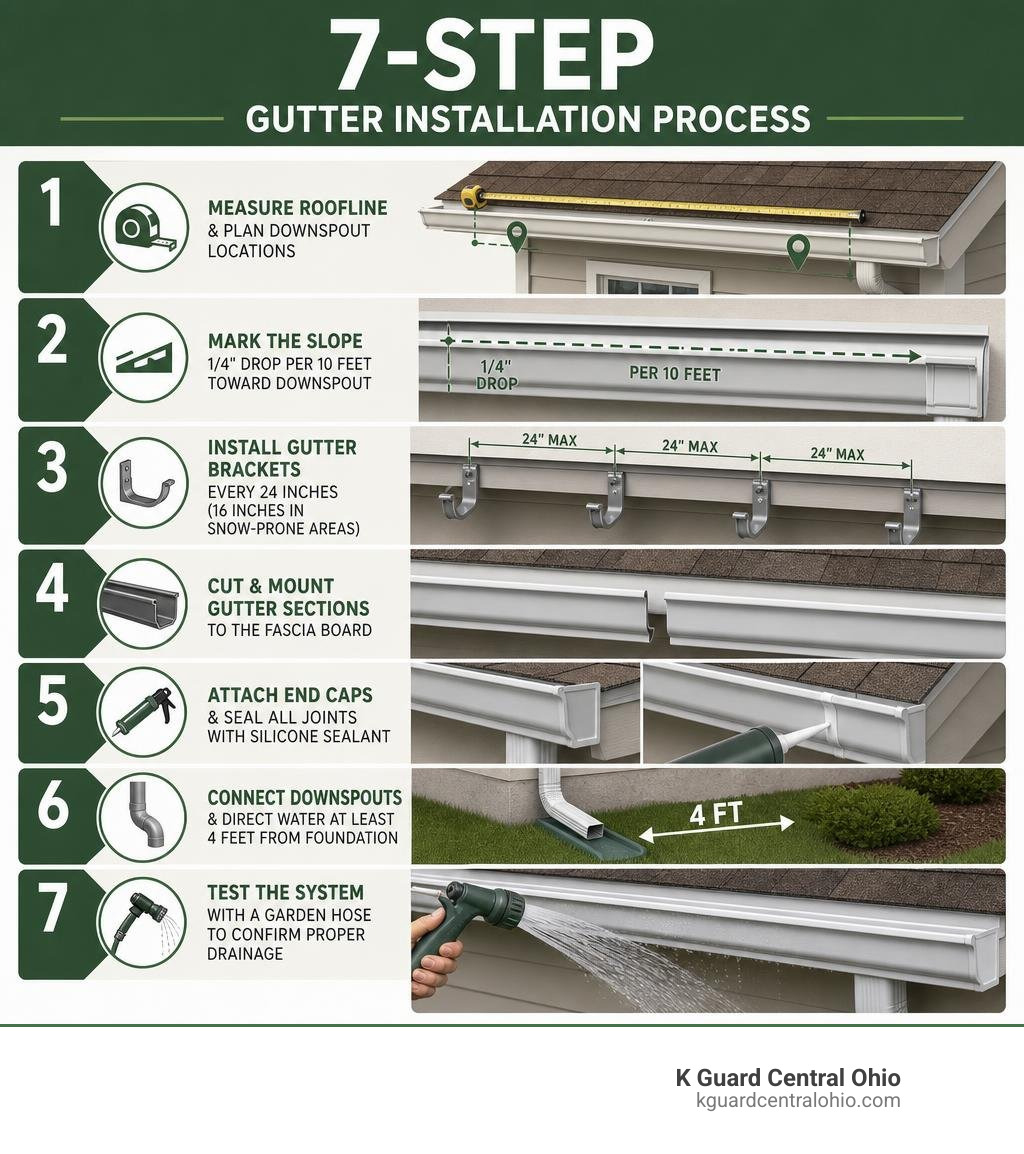
Here’s a quick overview of how gutters are installed:
- Measure your roofline and plan downspout locations
- Mark the slope — 1/4 inch drop per 10 feet toward each downspout
- Install gutter brackets every 24 inches (16 inches in snow-prone areas)
- Cut and mount gutter sections to the fascia board
- Attach end caps and seal all joints with silicone sealant
- Connect downspouts and direct water at least 4 feet from your foundation
- Test the system with a garden hose to confirm proper drainage
Without working gutters, rainwater runs off your roof and pools near your foundation. That leads to soil erosion, basement seepage, rotting fascia, and expensive structural repairs. A properly installed gutter system is one of the most cost-effective ways to protect your home’s long-term value.
DIY installation typically runs $200–$500 in materials, while a full professional installation averages around $5,000 for most homes — and often includes premium systems designed to eliminate ongoing maintenance entirely. These premium professional systems also offer a lifetime guarantee and the total elimination of annual gutter cleaning.
I’m Rich Mannino, General Manager of K-Guard Leaf Free Gutters, and after nearly two decades overseeing gutter protection systems and working with installers across the country, I’ve seen what separates a gutter installation process that lasts 30 years from one that fails in five. In this guide, I’ll walk you through exactly what to do — and what to avoid.
Planning Your Gutter Installation Process
Before you pick up a drill or climb a ladder, successful execution of the gutter installation process starts on the ground. Proper planning prevents mid-project trips to the hardware store and ensures you don’t end up with a system that sags or overflows during the first heavy Central Ohio thunderstorm.
The very first step is conducting a thorough inspection of your roofline. Walk the perimeter of your home and inspect the fascia boards—the flat, wooden boards running right beneath your roofline where your gutters will be mounted. If you spot soft wood, peeling paint, or visible rot, you must repair or replace these boards before hanging new gutters. Mounting heavy, water-filled gutters to rotted wood is a recipe for a catastrophic collapse.
Next, you need to measure the exact length of your roofline. Grab a 100-foot tape measure and record the length of each run where gutters will be installed. If you are doing a DIY installation, always add roughly 10% extra material to your final purchase list to account for cutting mistakes, corner miters, and section overlaps. If you are planning a DIY project, our DIY Guide to Installing Rain Gutters on a House is an excellent blueprint to help you map out your entire home layout before purchasing materials.
To help you decide on the right materials for your home, we have put together a comparison of the most common gutter materials and profiles used in modern installations:
| Gutter Material | Average Lifespan | Pros | Cons |
|---|---|---|---|
| Aluminum | 20–30 Years | Lightweight, rust-proof, highly customizable, budget-friendly | Can dent under heavy ladders or hail |
| Vinyl | 5–10 Years | Extremely cheap, lightweight, easy for DIY snap-together | Becomes brittle in Central Ohio winters, prone to cracking |
| Galvanized Steel | 15–25 Years | Highly durable, handles heavy snow/ice loads well | Heavy, prone to rust if coating is scratched, requires soldering |
| Copper | 50–100 Years | Unmatched durability, beautiful natural patina, leaks are rare | Extremely expensive, requires professional soldering |
Choosing the Right Gutter Materials and Profiles
Selecting the right material and profile is crucial for both the performance and curb appeal of your home. Aluminum gutters are the undisputed gold standard for residential properties, accounting for roughly 80% to 85% of all installations in the United States. Aluminum is highly rust-resistant, lightweight, and comes in a wide variety of colors to match your trim.
While vinyl gutters are often tempting for budget-conscious DIYers because they are cheap and snap together like toy blocks, we strongly discourage using them for permanent primary residences. Our brutal Central Ohio winters, with freezing and thawing cycles, make vinyl incredibly brittle. Over time, vinyl gutters sag, warp in the summer heat, and crack at the seams under heavy ice loads.
Beyond materials, you also need to select a gutter profile (the shape of the gutter trough). The two primary profiles are:
- K-Style Gutters: These are the most common gutters on modern homes. They feature a decorative front face that resembles crown molding. Because of their flat back, they mount flush against the fascia board. A standard 5-inch K-style gutter holds about 1.2 gallons of water per linear foot, while a 6-inch K-style gutter holds 40% more water—making 6-inch gutters highly recommended for larger roofs or homes with steep pitches.
- Half-Round Gutters: These look like a simple U-shape tube. They are highly favored on historic homes or properties with slate or cedar roofs. While half-round gutters have a beautiful classic aesthetic, they are more prone to overflowing because their smooth, curved shape holds less water volume than a K-style gutter of the same width.
Finally, you must choose between seamless gutters and sectional gutters. Sectional gutters come in pre-cut 10-foot lengths that you piece together with connectors. Every single connection point is a potential leak waiting to happen due to thermal expansion and contraction. Seamless gutters, on the other hand, are extruded from a single continuous piece of metal on-site using a specialized roll-forming machine. Seamless systems eliminate 80% of the joints, drastically lowering the risk of water damage to your home.
Calculating Slope and Downspout Spacing in the Gutter Installation Process
Water does not run uphill, which is why calculating the correct slope is a non-negotiable step in the gutter installation process. If your gutters are perfectly level, water will pool in the troughs, leading to stagnant water, mosquito breeding grounds, rust, and premature gutter failure. Conversely, if the slope is too steep, the gutters will look highly askew from the street, and water will rush toward the downspouts too quickly, causing them to overflow during heavy rains.
The industry standard for proper gutter slope is a drop of 1/4 inch for every 10 feet of gutter run toward the downspout. For example, if you have a straight 40-foot run of gutter with a downspout at one end, the low end of the gutter near the downspout must sit exactly 1 inch lower than the high end. If a single run of gutter exceeds 40 feet, it is best practice to “peak” the gutter in the middle and slope it downward toward downspouts located at both ends.
Proper downspout spacing is equally critical. As a general rule of thumb, you should install one downspout for every 30 to 40 linear feet of gutter. If your roof has a particularly steep pitch or if you live in an area prone to torrential downpours, you may want to increase this to one downspout every 20 to 25 feet. To learn more about the exact mechanics of downspout placement and assembly, check out our guide on How to Install Downspouts in 5 Simple Steps.
How to Install Gutters in 7 Easy Steps
Now that your planning is complete, it is time to roll up your sleeves and get to work. Before you begin, make sure you have all your safety gear ready. This includes heavy-duty work gloves to protect your hands from sharp metal edges, safety glasses, and a sturdy extension ladder with a stabilizer standoff to prevent damaging your shingles or fascia boards.
For a successful installation, you will also need a reliable cordless drill, freshly sharpened tin snips, a high-quality levels tool, a chalk line, and premium waterproof silicone sealant. If you want to compare standard DIY methodologies, you can read How to Install Gutters Yourself on Bob Vila’s site for additional context.

Executing the Step-by-Step Gutter Installation Process
Here is the exact step-by-step process we use to ensure a flawless, watertight gutter installation:
Step 1: Mark the Slope
Find the highest point of your gutter run (typically the corner opposite your downspout) and drive a nail into the fascia board about 1 1/4 inches below the drip edge. Move to the location of your downspout and calculate the required drop based on the 1/4-inch-per-10-feet rule. Drive a second nail at this lower point. Stretch a chalk line tightly between the two nails, verify the slope with a level, and snap the line. This gives you a perfect visual path for your installation.
Step 2: Install Gutter Brackets
Modern gutter systems utilize hidden fascia brackets rather than the outdated spike-and-ferrule systems that eventually pull loose from the wood. Space your brackets no more than 24 inches apart along your chalk line. In Central Ohio, where heavy snow and ice loads are common, we recommend tightening this spacing to 16 inches on center. Secure each bracket into the fascia and through to the solid wood rafters behind it using heavy-duty stainless steel screws.
Step 3: Cut Gutter Sections to Length
Lay your gutter sections on a pair of sawhorses. Measure twice and cut once using a hacksaw or heavy-duty tin snips. Make sure to deburr any rough metal edges left behind by the cuts. If you are joining multiple sectional pieces together, overlap the sections by 2 to 4 inches in the direction of the water flow to prevent water from catching on the seams.
Step 4: Cut Downspout Holes
Before hanging the gutter sections, you must cut the outlet holes for your downspouts. Mark the location of the downspout drop on the bottom of the gutter section. Use a 4-inch hole saw or a hammer and chisel to create a starter hole, then cut out the opening using tin snips. Insert the downspout outlet piece from the inside of the gutter, apply a heavy bead of silicone sealant, and secure it with pop rivets or short sheet metal screws.
Step 5: Mount the Gutters
With the help of a partner, lift the pre-assembled gutter section up to the fascia board. Hook the back edge of the gutter into the rear of the fascia brackets, then snap or screw the front of the brackets into the front lip of the gutter. Double-check your alignment against your snapped chalk line to ensure the slope remains perfect.
Step 6: Install End Caps and Seal Joints
Attach end caps to the open ends of your gutter runs. Secure them firmly with pop rivets or crimping tools. Next, apply a generous, continuous bead of high-quality silicone or butyl sealant to all seams, end caps, and around the downspout outlet. Smooth the sealant with a gloved finger to ensure there are absolutely no gaps where water could escape. For a deeper dive into the physics of watertight joints, Gutter Installation in 2026: Process + What Goes Wrong | The Roofing Brief provides excellent technical insights on avoiding early joint failure.
Step 7: Connect the Downspouts
Attach downspout elbows to the outlet on the bottom of your gutter. Measure and cut the vertical downspout sections to run down the side of your home, securing them to the exterior wall with U-shaped downspout straps spaced every 4 to 6 feet. At the bottom, attach an elbow pointing away from your home, and connect a downspout extension to carry the water at least 4 to 6 feet away from your foundation.
Common Gutter Installation Mistakes to Avoid
Even seasoned DIYers can make small errors during the gutter installation process that lead to major headaches down the road. Recognizing these pitfalls before you begin will save you time and money.
- Incorrect Slope: This is the single most common error. If the slope is too flat, water pools, leading to rust, mold, and sagging. If the slope is too steep, water rushes too fast and splashes over the end of the gutter. Always stick to the 1/4-inch-per-10-feet rule.
- Improper Bracket Spacing: Spacing brackets too far apart (such as every 3 or 4 feet) saves a few dollars upfront but guarantees disaster. When winter hits Central Ohio, snow and ice will pool in the gutters, causing the unsupported metal to sag, bend, or pull completely away from the house. Keep brackets spaced at 24 inches max, or 16 inches for maximum durability.
- Poor Joint Sealing: Skipping or rushing the sealing process is a recipe for immediate leaks. Always use a high-quality, exterior-grade gutter sealant—never cheap bathroom caulk. Ensure all surfaces are clean and completely dry before applying the sealant, and allow at least 12 to 24 hours for it to cure before testing the system.
- Too Few Downspouts: Trying to force a 100-foot gutter run to drain through a single downspout will cause the system to back up and overflow during heavy rains. Ensure you have a downspout for every 30 to 40 feet of gutter.
- Inadequate Downspout Discharge: Dumping water right at the base of your foundation defeats the entire purpose of having gutters. Water will seep into your basement, cause foundation cracking, and wash away your landscaping. Always extend downspouts at least 4 feet away from your home’s foundation.
For a comprehensive checklist on how to avoid these and other common installation errors, take a look at our guide: Install and Replace Rain Gutters Like a Pro The Ultimate Homeowners Guide.
DIY vs. Professional Gutter Installation Costs
When deciding whether to tackle this project yourself or hire a professional, it is important to weigh the upfront material costs against the long-term value of professional labor.
A DIY gutter installation is undeniably cheaper upfront. You can expect to spend between $200 and $500 on raw materials (sectional gutters, brackets, downspouts, and sealant) depending on the size of your home. However, you must also factor in the cost of tools you might not own, such as extension ladders, tin snips, and miter saws, which can easily add another $150 to $300 to your budget.
In contrast, hiring a professional gutter contractor for a complete standard residential home averages around $5,000. While this is a larger upfront investment, it covers seamless gutter fabrication, professional labor, warranties, and—most importantly—your personal safety. Gutter work is inherently dangerous; ladder falls are one of the leading causes of household injuries in the United States.
To help guide your decision-making process, we highly recommend reading Hiring a Gutter Contractor What You Need to Know Before You Install.
When to Hire a Professional Gutter Installer
While a single-story ranch home with a straight roofline is a reasonable project for an experienced DIYer, there are several scenarios where DIY is simply not practical or safe:
- Two-Story or Three-Story Homes: Working on a ladder 20 to 30 feet in the air while balancing heavy, awkward gutter sections is extremely dangerous. Professional crews have the safety harnesses, scaffolding, and experience to handle heights safely.
- Complex Rooflines: If your home features multiple gables, valleys, dormers, or steep pitches, the calculations and custom cuts required for proper water flow become incredibly complex.
- Seamless Gutter Fabrication: If you want seamless gutters—the undisputed gold standard that eliminates leak points—you must hire a professional. Seamless gutters require a specialized roll-forming machine that can only be operated by licensed contractors.
If you are located in Central Ohio, you can find reputable local installation services by checking out THE BEST 10 GUTTER SERVICES IN COLUMBUS, OH – Yelp to see how local experts handle the unique challenges of our regional climate.
Frequently Asked Questions About Gutter Installation
How often should gutters be cleaned?
Traditional open gutters should be cleaned at least twice a year—typically in the spring and late fall. If your property has heavy tree cover, especially pine trees or oak trees, you may need to clean them as often as three or four times a year to prevent clogs and overflow.
What is the purpose of gutter guards?
Gutter guards are designed to act as a barrier, allowing rainwater to enter your gutter system while keeping leaves, twigs, pine needles, and pests out. Installing a high-performance integrated gutter system can reduce your annual gutter maintenance by up to 80%—or eliminate cleaning entirely if you choose a fully integrated hooded system.
How do I know if my gutters need to be replaced?
Common warning signs include visible cracks or rust spots, sagging or pulling away from the fascia board, peeling paint on your siding, mold in your basement, or water pooling around your foundation. If your current gutter system is over 20 years old, it is highly likely time for a replacement.
Conclusion
At the end of the day, the gutter installation process is a critical investment in your home’s structure. While DIY options exist, they often leave you with sectional seams that leak, sag, and require dangerous, exhausting maintenance year after year.
At K Guard Central Ohio, we offer a permanent solution. Our specialized, fully integrated K-Guard Leaf Free Gutter System is a seamless, heavy-duty system that features a patented hood design. This hood utilizes liquid adhesion to channel rainwater directly into the gutter while completely shedding leaves, twigs, and debris.
When you choose K-Guard, you get:
- A lifetime guarantee that your gutters will never clog or pull away from your home.
- The total elimination of annual gutter cleaning—you will never have to climb a dangerous ladder to clean muck out of your gutters again.
- An average professional installation cost of $5,000, providing unmatched value and lifetime peace of mind.
Ready to protect your Central Ohio home forever? Learn more about How It Works, discover Why KGuard is the premier choice for local homeowners, and explore Our Products.
We make the upgrade easy. Check out our seamless Installation process, learn more about our Leaf Free Gutter Installation in Columbus Ohio, and contact us today to request your Free Estimate!