The Ultimate Guide to Gutter to Downspout Connection and Fittings
Why Your Gutter to Downspout Connection Is More Important Than You Think
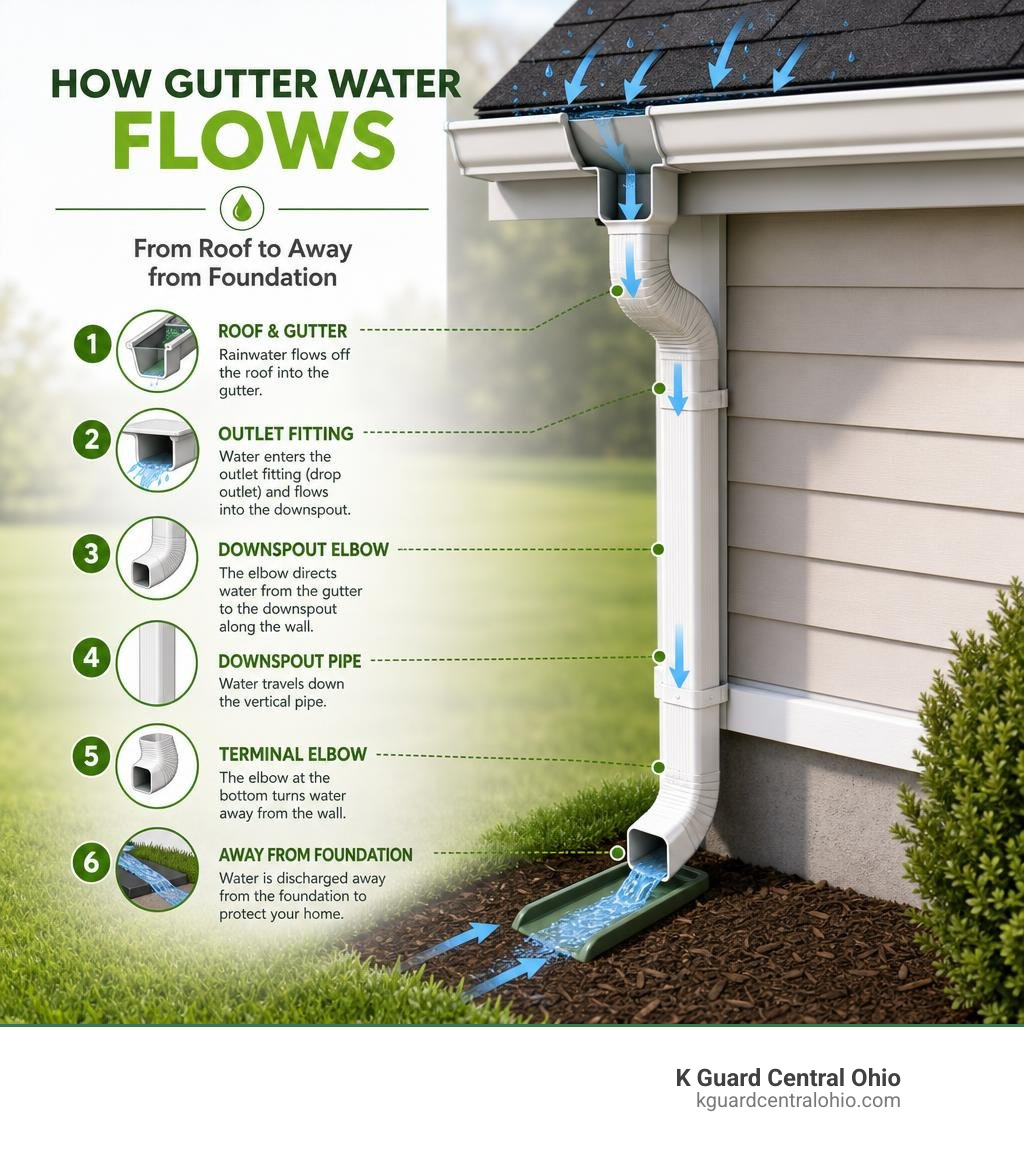
A proper gutter to downspout connection is the critical link in your home’s entire water management system. When it works, rainwater flows cleanly off your roof, through the gutter trough, and safely away from your foundation. When it fails, even a moderate rainstorm can send water pouring down your siding, pooling at your foundation, and setting the stage for costly damage.
Quick answer: Here’s how a gutter-to-downspout connection works and what you need to know:
| Component | What It Does |
|---|---|
| Gutter outlet (drop outlet) | Fitting cut into the gutter floor; transitions water into the downspout |
| Downspout elbows | Angle the pipe from the gutter face to the wall (A-style or B-style) |
| Downspout pipe | Vertical pipe (typically 2×3″ or 3×4″) that carries water down the wall |
| Terminal elbow | Redirects water at ground level away from the foundation |
| Extension or adapter | Directs water further from the foundation via splash block or buried pipe |
The most common residential setup uses a 3-inch rectangular gutter outlet connecting a K-style gutter to a 2×3-inch rectangular downspout, with one downspout recommended for every 20 to 40 linear feet of gutter run.
Getting this connection right matters more than most homeowners realize. Water damage repairs from poor drainage can run anywhere from $2,000 to $15,000, depending on how long the problem goes unnoticed. Alternatively, investing in a complete, worry-free K-Guard system averages around $5,000 for installation, which comes with a lifetime guarantee and completely eliminates the need for annual gutter cleaning.
This guide covers everything — fitting types, sizing, installation steps, underground connections, troubleshooting, and maintenance — so you can make smart decisions about your system.
I’m Rich Mannino, General Manager of K-Guard Leaf Free Gutters, and after nearly two decades overseeing gutter system installations across Central Ohio, I’ve seen how a poorly sealed or incorrectly sized gutter to downspout connection leads to the water damage issues homeowners dread most. That experience shapes every recommendation in this guide.
Quick gutter to downspout connection definitions:
- adding a downspout to gutter
- downspouts installation
- how to install downspout straps to vinyl siding
Mastering the Gutter to Downspout Connection: Types and Fittings
To understand how water transitions from your roof to the ground, we have to look closely at the hardware doing the heavy lifting. The gutter to downspout connection relies on a series of specialized fittings designed to keep water moving without restriction.
At the heart of this transition is the gutter outlet (often called a drop outlet). This is the metal or vinyl sleeve inserted into the bottom of the gutter trough. It acts as the funnel, channeling water from the horizontal gutter run down into the vertical downspout. These outlets come in various shapes—including round, rectangular, strip, and end outlets—to match the profile of your gutters.
Once the water passes through the outlet, it immediately encounters downspout elbows. Because your gutters sit on the fascia board (which overhangs the house), and your downspouts must run flush against the exterior wall, you need elbows to bridge that physical gap.
Depending on how your home is built, you will need either A-style or B-style elbows. Choosing the wrong one is a classic DIY mistake that leads to awkward, twisted connections and immediate leaks.
To help you visualize the differences, here is a quick comparison of the two primary elbow configurations:
| Elbow Type | Direction of Bend | Best Used For |
|---|---|---|
| A-Style | Bends forward or backward (parallel to the wide face of the downspout) | Standard walls where the downspout runs straight down the front of the fascia |
| B-Style | Bends side-to-side (parallel to the narrow face of the downspout) | Wrapping around corners or navigating side-wall transitions |
Selecting the right profile shape is just as critical. While round downspouts are highly efficient and offer a classic look, rectangular profiles are the standard for modern residential construction. To dive deeper into these profile differences, check out our guide on the Different Types of Downspouts Round Square and Everything in Between.
Sizing and Style Selection (A-Style vs. B-Style)
Matching your fittings to your gutter dimensions is non-negotiable. Standard residential systems feature K-style gutters paired with either 2×3-inch or 3×4-inch rectangular downspouts.
If you have a standard roof with moderate rainfall, a 2×3-inch downspout paired with a 3-inch rectangular outlet is usually sufficient. However, for steep roofs, large surface areas, or the heavy summer downpours we experience here in Central Ohio, upgrading to a 3×4-inch downspout dramatically increases water capacity and reduces the risk of overflow.
When selecting your elbows, look closely at how the downspout needs to travel. An A-style elbow moves water “front to back” relative to the wide side of the pipe. If you are standing in front of your house looking at the downspout, and the elbow curves toward the wall, you need an A-style. If the downspout needs to turn to the left or right along the wall, you need a B-style elbow. Getting this directional flow right ensures that water moves smoothly without pooling at the joints.
Specialty Connectors: Y-Diverters and Adapters
Sometimes, a straight drop from the gutter to the ground isn’t the best design for your property. That is where specialty connectors come into play.
Y-connectors (or Y-diverters) allow you to merge two downspouts into a single drainage line, which is incredibly useful for tight spaces or complex roof designs where multiple roof valleys meet.
If you are passionate about water conservation, you can install diverter valves within your downspout run. These clever fittings allow you to easily direct clean roof runoff into rain barrels during the spring and summer. When the rain barrel is full, or when winter approaches, you simply flip the lever on the diverter to send the water back down the main downspout line, protecting your home from winter freeze-up.
How to Install and Secure Your Downspout System
Installing a secure, leak-free gutter to downspout connection requires precision, patience, and the right set of tools. Before you climb the ladder, make sure you have your materials staged on the ground.

To complete a professional-grade installation, you will need:
- A high-quality gutter outlet fitting
- Downspout pipe and elbows (A-style or B-style)
- A drill with a step drill bit or a hole saw
- Aviation snips (tin snips)
- A hand seamer or crimping tool
- Stainless steel zip screws or pop rivets
- Premium exterior-grade silicone gutter sealant
- A tape measure and safety glasses
Using the correct fasteners is highly important. When working with aluminum gutters, always use stainless steel or matching aluminum screws to prevent galvanic corrosion, which occurs when dissimilar metals react and degrade over time. For a complete overview of the entire process, read our guide on How to Install Downspouts in 5 Simple Steps.
Step-by-Step Installation of a Gutter to Downspout Connection
If you are retrofitting an existing system or building a new one, follow these steps to ensure a watertight seal:
- Mark the Outlet Location: Locate the lowest point of your gutter run. Mark the position for your outlet fitting, ensuring it is positioned 6 to 12 inches away from the end cap to allow room for downspout brackets on the wall.
- Cut the Hole: Use a hole saw or drill a pilot hole and use your aviation snips to carefully cut out the marked opening. Be precise—a hole that is cut too large will create gaps that sealant alone cannot bridge.
- Install the Outlet Fitting: Coat the flange of the drop outlet with a generous bead of silicone gutter sealant. Insert the outlet into the hole from the inside of the gutter trough so the neck protrudes downward. Secure it from the inside using pop rivets or short sheet metal screws.
- Apply Additional Sealant: Apply another layer of sealant around the seam on the inside of the gutter, smoothing it out with a gloved finger to ensure a completely seamless, watertight barrier.
- Let It Cure: Allow the sealant to cure for a full 24 hours before exposing it to water. If temperatures are below 50°F, extend this curing time to ensure a proper bond.
- Connect the Elbows: Slide your first elbow over the protruding neck of the outlet. Pro tip: Always slide the upper pipe inside the lower pipe. This “shingling” technique ensures that water flows naturally through the joint instead of finding a seam to leak through. Secure the joint with two zip screws.
For more detailed tips on executing this transition without pulling your hair out, consult our guide on Adding a Downspout to Existing Gutter Systems Without the Stress.
Securing the Assembly to Your Home’s Exterior
A downspout filled with rushing water during a Central Ohio storm is heavy and subjected to strong wind loads. Without proper support, the entire assembly will flex, pull away from the wall, and eventually break the seal at the gutter trough.
To prevent this, you must secure the downspout using aluminum wall straps (brackets). Space these brackets roughly every 5 to 6 feet along the vertical run, placing one near the top elbow transition and another near the ground level.
When mounting to wood or vinyl siding, ensure your screws penetrate the solid wood framing behind the siding. For brick, stone, or stucco exteriors, drill pilot holes and use high-quality masonry anchors to keep the brackets firmly anchored. To learn more about selecting the right hardware for this step, read our comprehensive guide on how Aluminum Gutter Wall Straps Secure Your Drainage System Today.
Connecting Downspouts to Underground Drainage and Extensions
Getting water out of your gutters is only half the battle. Once it reaches the bottom of the downspout, you must direct it away from your home’s foundation. Leaving water to dump directly at the base of your walls is a recipe for basement flooding, soil erosion, and foundation cracking.
Many homeowners choose to bury their downspout extensions to keep their lawns looking clean and free of tripping hazards. When doing this, you have two primary pipe options: rigid PVC (Schedule 40 or SDR 35) and flexible corrugated pipe.
We highly recommend using rigid PVC. While corrugated pipe is cheaper and easier to bend around obstacles, its ridged interior acts like a lint roller, trapping shingle grit, leaves, and organic debris. Over time, this leads to underground clogs that are incredibly difficult to clear. Rigid PVC has a smooth interior that promotes fast water flow and resists root intrusion and soil pressure.
In Central Ohio, winter freeze protection is another major factor. Any standing water inside an underground pipe will freeze, expand, and shatter the pipe. To prevent this, ensure your trenches are dug to a minimum depth of 12 inches, and maintain a consistent slope of 1/4 inch of drop per foot of run (or 1 inch of drop for every 10 feet) to ensure gravity pulls all water out of the system. For a complete deep dive, check out The Complete Guide to Buried Downspout Extensions and Drains.
Transitioning from Rectangular Downspouts to Round Pipes
Connecting a thin, rectangular aluminum downspout to a thick, round plastic underground pipe requires a specialized transition fitting called a tile adapter.
Because PVC pipe sizes and downspout dimensions are not universally standardized, a generic “one-size-fits-all” adapter from a big-box store often fits poorly, leaving loose gaps that leak water right next to your foundation. Always choose a flush-fit adapter designed specifically for your pipe type (such as Schedule 40 or SDR 35).
When installing the adapter:
- Crimp the bottom end of your metal downspout slightly to ensure a snug fit inside the adapter.
- Slide the downspout into the adapter, ensuring it seats deeply.
- Secure the connection with zip screws, but avoid gluing this specific joint if you want future access for cleanouts.
- If you are connecting to an old clay sewer standpipe, use a rubber cap or expansion plug secured with a hose clamp to seal the gap and prevent debris from falling in.
For professional assistance with these complex underground transitions, you can learn more about Downspout Drain Installation options in our region, or consult local plumbing experts for major Downspout Drain Repair needs if your existing underground lines have collapsed.
Extending Drainage Away from the Foundation
If burying your lines isn’t an option due to landscaping, tree roots, or local municipal codes, you can use above-ground extensions to protect your foundation.
At a bare minimum, above-ground downspout extensions should direct water at least 5 feet away from your foundation (10 feet is highly recommended if you have clay-heavy soil or poor natural grading).
You can terminate these extensions using:
- Splash Blocks: Simple plastic or concrete channels placed under the terminal elbow to disperse water energy and prevent soil erosion.
- Pop-Up Emitters: Installed at the end of a buried line, these green caps sit flush with your lawn. When water fills the pipe, the pressure pushes the lid up, letting water flow harmlessly over your grass. When the rain stops, a built-in spring closes the lid to keep out leaves, rodents, and lawnmowers.
Before making any major changes to how your system discharges water, always review the official Downspout Disconnection Instructions to ensure you remain compliant with local environmental and stormwater runoff regulations.
Troubleshooting and Maintenance for Leak-Free Performance
Like any part of your home’s exterior, your gutter to downspout connection requires regular attention to perform its job. Over time, wind, temperature swings, and roof debris will test the strength of your fittings and seals.
The biggest threat to your connections is debris buildup. Leaves, twigs, and shingle grit wash down the gutter and lodge directly in the narrow throat of the drop outlet or within the sharp bends of the elbows. Once a clog forms, water backs up, fills the gutter trough, and leaks out of the seams.
Integrating high-quality leaf guards is the most effective way to protect these connection points from clogs. To understand how these components work together, read The Complete Guide to Gutter Downspouts.
Troubleshooting a Leaking Gutter to Downspout Connection
If you notice water dripping from the joints underneath your gutters during a rainstorm, it is time to investigate. The most common causes of leaks at the connection include:
- Sealant Failure: Over time, UV rays and temperature fluctuations cause silicone sealant to dry out, crack, and pull away from the metal.
- Joint Separation: High winds or heavy snow loads can pull downspout sections apart, especially if they weren’t fastened with screws.
- Standing Water: If your gutters aren’t pitched correctly (they should slope 1/2 inch for every 10 feet toward the downspout), water will pool at the connection, slowly degrading the seals.
To repair a leaking outlet, scrape away all old, failing sealant, clean the metal thoroughly with rubbing alcohol, and apply a fresh bead of premium gutter sealant. Remember to let it cure completely before the next rain! For a comprehensive troubleshooting checklist, refer to this detailed Gutter Outlet Repair Guide.
Clearing Stubborn Clogs in Elbows and Outlets
If your downspouts are backing up, you need to clear the blockage before it causes water to back up under your roof shingles.
To clear a stubborn clog:
- Tap gently on the outside of the downspout elbows with a screwdriver handle. A hollow sound indicates a clear pipe, while a dull thud pinpoints the location of the clog.
- If the clog is near the top, use a hand-cranked plumbing snake or a stiff wire coat hanger inserted through the gutter outlet to break up the debris.
- For deep or stubborn clogs, disconnect the elbow sections by removing the zip screws. This allows you to clean out compacted leaves and shingle grit directly.
- Flush the system from the top using a garden hose with a high-pressure nozzle to wash away any remaining sediment.
Frequently Asked Questions about Gutter Connections
How far should a downspout extend from the foundation?
At an absolute minimum, downspouts should extend 5 feet away from your home’s foundation. If your yard has clay-heavy soil, a flat grade, or a history of basement dampness, extending the line 10 feet is much safer. Proper extension prevents water from soaking back into the soil next to your basement walls, which can lead to foundation shifting, basement flooding, and mold growth.
Can I connect my downspout directly to an underground sewer line?
In most municipalities, including many areas across Central Ohio, connecting roof runoff directly to municipal sanitary sewer lines is illegal because it overburdens water treatment plants during heavy storms. However, you can often connect to dedicated storm-water lines. If you are disconnecting an old sewer connection, make sure to properly cap the standpipe with an expansion plug to prevent sewer gases and debris from escaping.
What is the difference between A-style and B-style elbows?
The difference lies entirely in the direction of the bend relative to the downspout’s rectangular profile. An A-style elbow bends forward or backward along the wide face of the downspout. A B-style elbow bends side-to-side along the narrow face. You must select the style that matches the path your downspout needs to take to hug your home’s exterior walls.
Conclusion
At the end of the day, maintaining a traditional gutter system with its endless fittings, seams, and clog-prone elbows is a constant chore. If you are tired of climbing ladders to clear out rotting leaves, dealing with leaking joints, or worrying about water pooling near your foundation, there is a better way.
At K Guard Central Ohio, we offer a specialized, fully integrated, leaf-free gutter guard system. Our design features oversized gutter troughs and high-capacity downspouts that handle even the heaviest Central Ohio rainstorms with ease. Because our hood design naturally sheds leaves, pine needles, and shingle grit, your gutter to downspout connection remains completely clear of debris forever.
We back our system with a lifetime guarantee—meaning you will never have to clean your gutters again, eliminating a major home maintenance headache. With an average house installation cost of approximately $5,000, investing in a K-Guard system protects your home’s foundation, siding, and roof from water damage for a lifetime.
Ready to upgrade to a worry-free system? Contact us today to Schedule a Professional Gutter Installation and get your free estimate!